How to Make Low-Sodium Umeboshi (Japanese Pickled Plums)
A low-sodium umeboshi recipe made with just three ingredients — ripe ume plums, coarse salt, and shochu or ume vinegar. At 10% salt, pickling and storage are both done in the refrigerator. Less salty, more delicate — and still completely additive-free.
Equipment
- Large bowl for washing the ume
- Plate or colander for drying
- kitchen towel
- Knife
- Bamboo rack or net
- Ziploc bag (medium size)
- Container to hold the bag, catch any leaks, and act as a weight
Ingredients
- 500 g ripe ume plums
- 50 g coarse salt 10% of ume weight
- 2 tablespoon shochu or vodka, or white ume plum vinegar
Instructions
Preparing the ume
- Wash: Gently wash the ripe ume in water to remove any surface dirt.500 g ripe ume plums
- Dry: Transfer to a plate or colander and let dry completely. Pat dry with a kitchen towel to speed things up.
- Trim: Cut away any damaged or discolored spots with a knife. Remove the stem ends using a bamboo skewer or the tip of a knife.
- Coat: Place the ume in a Ziploc bag. Add the shochu (or white ume plum vinegar), then the salt.50 g coarse salt, 2 tbsp shochu
- Mix: Loosely seal the bag and gently roll the ume around from the outside until the salt clings to every plum in a damp, even coat.
- Weight: Place the bag seal-side up inside a container. Set another container filled with water on top as a weight — aim for 1–2 times the weight of the ume.
- Refrigerate: Store in the refrigerator. Flip the bag once a day until the pickling liquid fully rises.
- Wait: Once the liquid has fully risen, reduce the weight by half. Continue pickling until midsummer — ideally late July to early August, when heat and sunlight are at their peak.
If your ripe ume are too blemished for making umeboshi, they're still perfect for ripe ume jam or ripe ume nectar syrup.
A container that fits neatly inside works best, so the pressure reaches every plum evenly.
At least one month of pickling lets the salt work its way through the flesh and the skins to firm up.
Drying the umeboshi
- Arrange: Pick a run of at least three clear, sunny days. Arrange the ume in a single layer on a rack or net, making sure they don't touch each other.
- Dry: Bring the ume indoors on the first and second nights. On the third night, leave them outside under the eaves to catch the night dew — this gives the skins a softer, more supple finish.
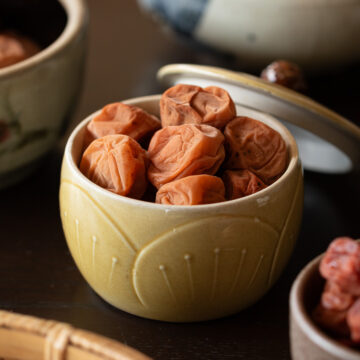
- Store: On the morning of day four, transfer the finished low-sodium umeboshi to a clean container and refrigerate. They can be eaten right away, but a month of resting rounds out the saltiness nicely.
Choose a spot with good airflow and direct sunlight.
Pour the remaining liquid — white ume plum vinegar — into a clean jar and refrigerate.
Flip each plum once a day to dry all sides evenly. The best time is in the morning, just before bringing them outside — the skins are less likely to stick to the rack and tear.
Ceramic or glass containers are best.
Notes
▶ Always use fully ripe ume
Unripe or firm ume won't release enough liquid. Always use fully ripe fruit.
If your ume aren't quite ready, ripen them at home:
- Spread them out in a single layer on a plate or colander, leaving as much space as possible between each plum.
- Leave in a cool, dark, well-ventilated spot for a few days.
- Turn them once a day if you can, so they don't sit in moisture.